
Scenario Generation
When GSGT is started, it is necessary to open an existing scenario or to create a new scenario.
| Selection | Response |
| Open | Choose an existing scenario from $GSGT_WORK_PATH |
| New | 1. Choose (1 or more ERAM and TBFM) adaptation from $ADAPTATION_PATH. 2. Choose a location in $GSGT_WORK_PATH, and enter a name for the new scenario. NOTE: Optionally, a weather scenario can be associated at this time. (This can also be added or changed after the scenario is created.) |
Creating a new scenario
After launching GSGT from the command line the GSGT window will pop up. In the window 'left click' on 'Scenario' and select 'New'. Alternatively you can select the blank piece of paper icon below 'Scenario'.
Picture of new Scenario
'New Scenario' will appear. GSGT will need at least one ERAM airspace adaptation selected in order to create a scenario. 'Left click' on 'adaptation' and then the subfolder 'eadp' to get a list of available ERAM adaptations. Select at least one airspace to load.
NOTE: The comments will say which facility the ERAM adaptation is for.
After selecting an airspace 'right click' on the selected adaptation and select 'Add TBFM adaptation' from the drop down menu. A new 'Choose Adaptation Directory' will be displayed. 'Double click on adapt' to see available TBFM adaptations. 'Left click' the desired adaptation and 'left click' the 'Choose Button'. 'Click' the 'Next' button in the 'New Scenario' window. Give your scenario a name and click 'Next'. You will be asked if you want to give your scenario weather. You may select a weather scenario now or choose to add it in later. Click 'Finish'. After giving GSGT a few seconds to parse the adaptation your selected airspace will be loaded.
Opening an existing scenario
After launching GSGT from the command line the GSGT window will pop up. In the window 'left click' on 'Scenario' and select 'Open'. Alternatively you can select the folder icon below 'Scenario'. From the 'Open Scenario' window, select the scenario you would like to open and click the 'Finish' button.
If you know where your scenario is located in the directory you may 'cd' to the directory. Launching GSGT while inside the scenario directory will automatically open that scenario.
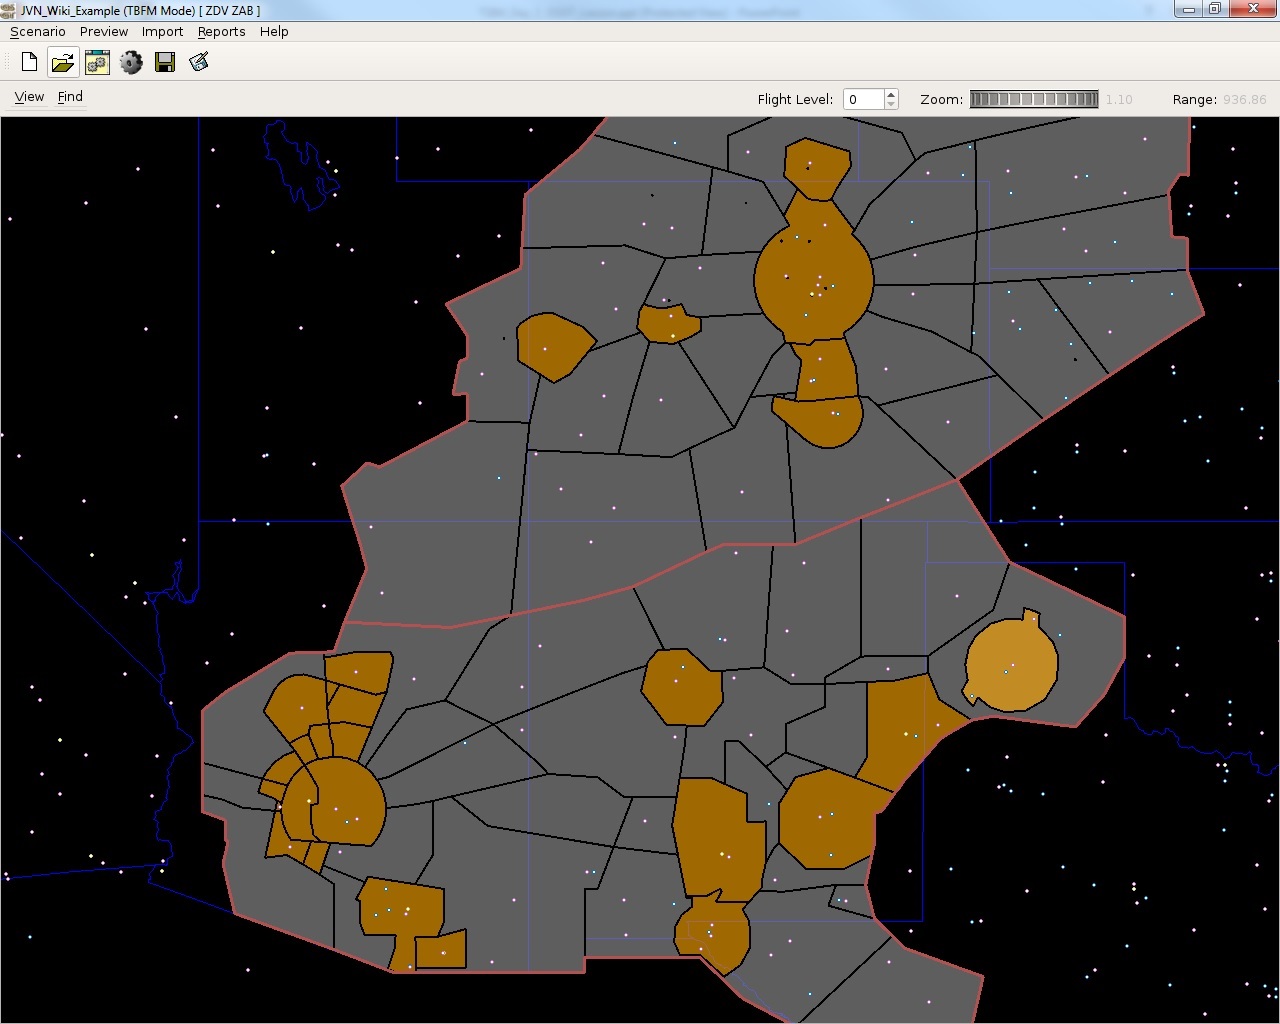
Map Display
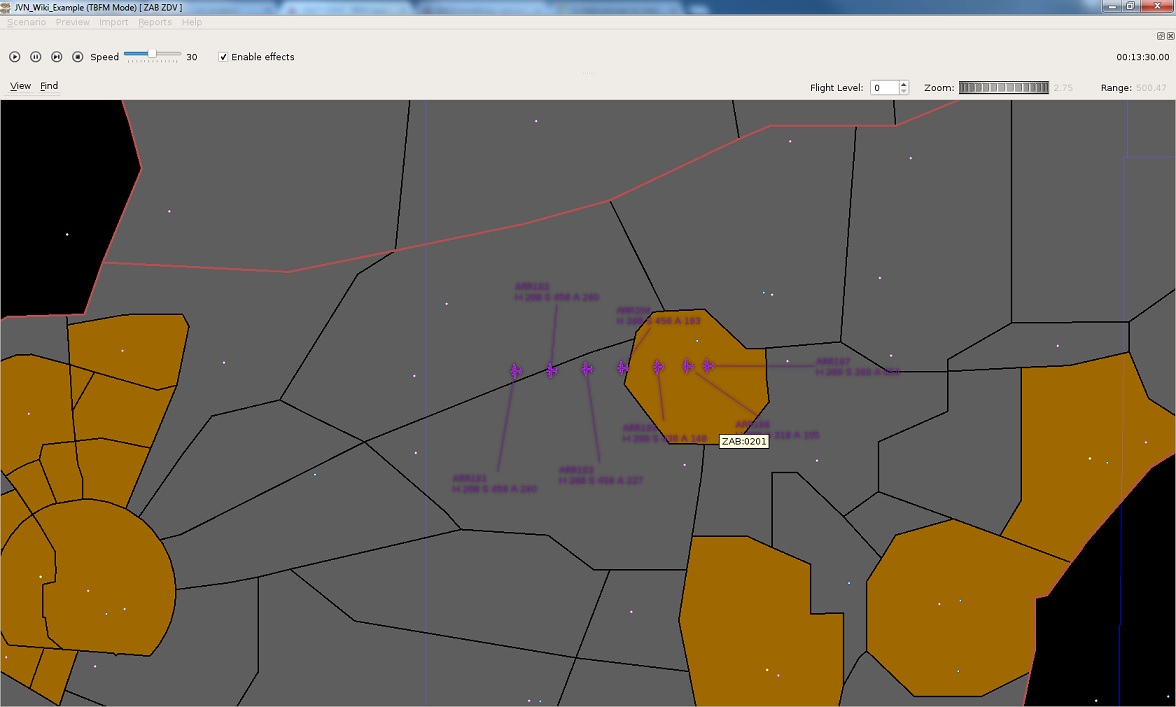
After GSGT parses the adaptation and loads the airspace a large map area is displayed including a menu bar (View and Find), Flight level selector, Zoom control, Range indicator, and status or measurement bar (when invoked) along the bottom.

- Orange areas on the map indicate terminal airspace while gray areas indicate enroute airspace
- Sector and facility boundaries are based on the selected 'Flight Level' and change as the altitude is changed.
- Range and Flight Level (in hundreds of feet) can be changed.
- Additional map elements for display:
- Airports
- Fixes
- Airways and adapted routes
- Neighbor facilities and non-US boundaries
- Positions and distances between points can be identified using the mouse. While holding 'shift' down, 'left click' and drag on the airspace to create a measurement line. The distance, heading, and coordinates of the line can be found on the bottom of the screen.
- The Find button can be used to search for airspace elements in the adaptation. A context box with additional information is displayed.
Scenario Editor
To launch the Scenario Editor, select 'Edit' from the 'Scenario' menu bar item or from the icon bar. In TBFM mode, the Scenario Editor has the following tabs:
- Preferences
- Targets
- Adaptation
- System Commands
- Record Select Indicators(RSI)
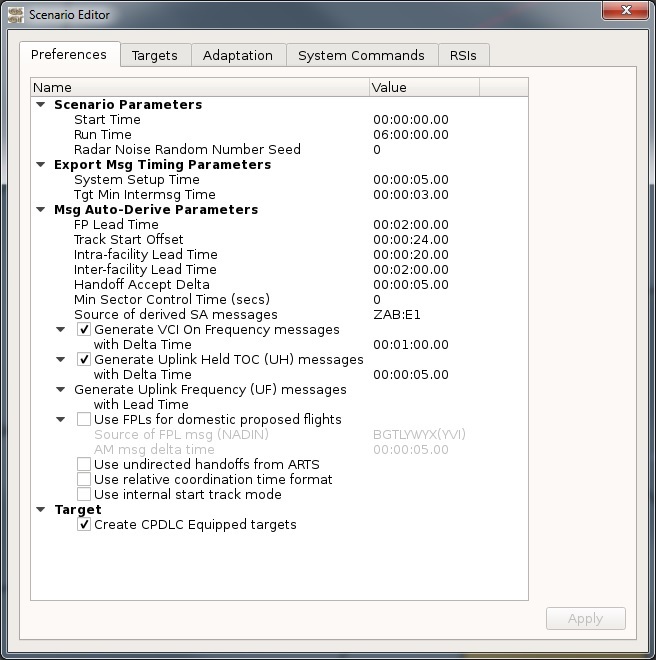
Preferences
Preferences control timing for auto-derived messages.
Preferences tab includes:
- Scenario start time
- Duration
- FP lead time

Target Editor
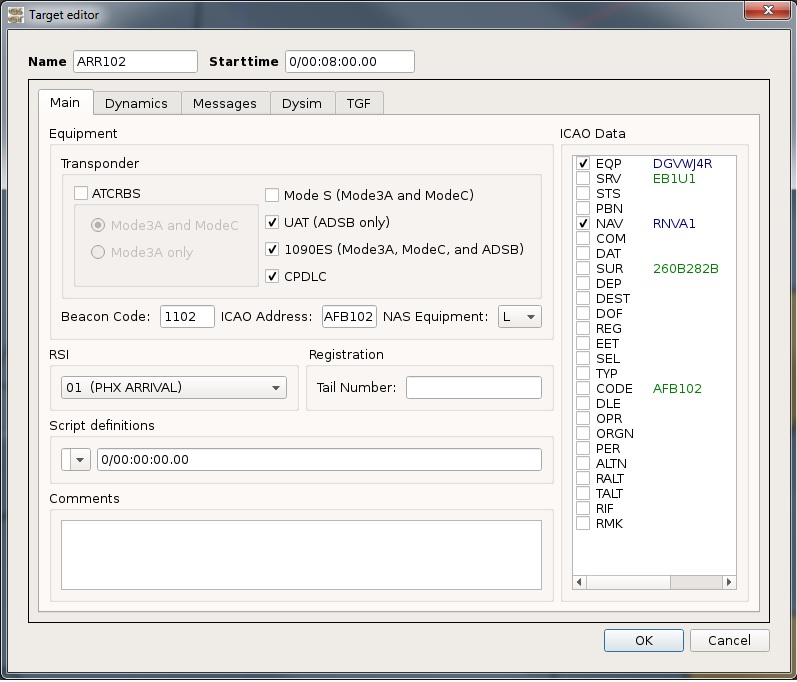
The Target Editor has several changes for TBFM mode. In the Main tab, the Dynamics pane – including Aircraft Type (AChar), Speed and Flight Level (Flevel), and the Aircraft pane – including the number of aircraft and Heavy indicator, have been removed. In the Dysim tab, the pilot Symbol text box and the PPEs and Prompts panes have been removed. A new Dynamics tab replaces the Route and Events tabs.


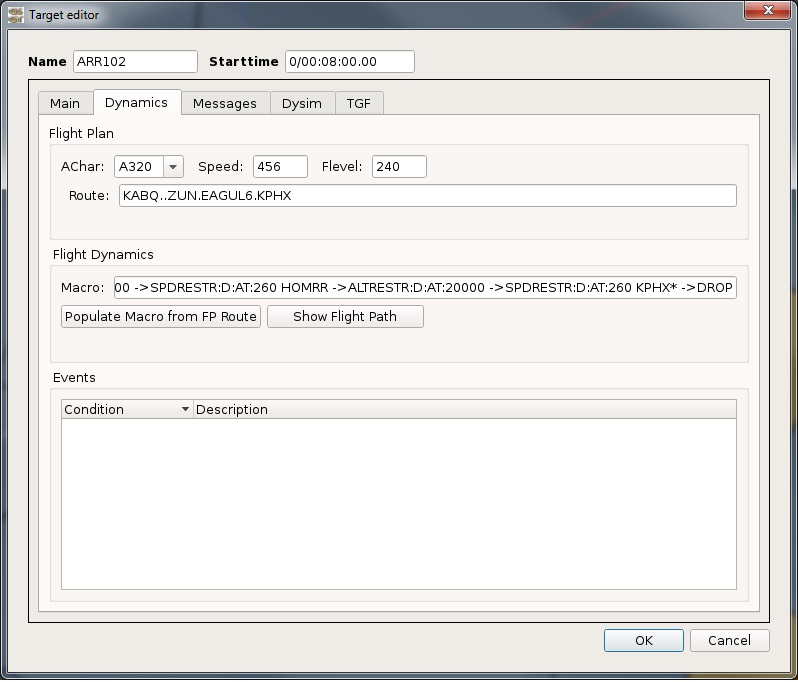
The new Dynamics tab is made up of three panes – Flight Plan, Flight Dynamics and Events. The Flight Plan pane includes the AChar drop down, Speed and Flevel text boxes, as well as the Route text box. The Flight Dynamics pane includes a new Macro text box and “Populate Macro from FP Route” and “Show Flight Path” buttons. The Events pane can be used to create target events in the same way that was previously done in the Events tab. The one major change regarding events is that accompanying NAS messages are not automatically generated, but can be manually scripted using the Messages tab.
The Macro text box allows a target to deviate from the route that is used to generate the flight plan. Furthermore, when adaptation is loaded that includes TBFM terminal waypoints in addition to the ERAM XML data, the Macro text box can be used to create a terminal route. Along with terminal waypoints, the terminal route can include altitude and speed restrictions and Radius-to-Fix (RF) turn segments. Valid Macro route elements are:
| Route Element | Format |
| Position | FIX or [+/-]dd:dd:dd:dd, [+/-]dd:dd:dd:dd |
| Altitude | /ddd[~ddd] |
| Speed | ddd[~dddd] |
| Heading | ->Hddd |
| Drop Target | ->DROP |
| Alt Restriction | [altRestr:D:AT:dddd.d] for "at altitude" [altRestr:D:AOB:dddd.d] for "at or below" [altRestr:D:AOA:dddd.d] for "at or above" |
| Speed Restriction | spdRestr:D:AT:ddd.d (always "at" speed) |
| RF Turn | FIX1{flyOver} FIX2{rf:R:ddd.d} for right turns or FIX1{flyOver} FIX2{rf:L:ddd.d} for left turns and ddd.d is the outbound heading |

| Name | Command | Description |
| Change Position | FIX or [+/-]dd:dd:dd:dd, [+/-]dd:dd:dd:dd | Target will fly to fix or coordinates entered |
| Change Altitude | ->A150 | Set targets altitude in hundreds of feet. |
| Change Speed | ->V255 | Set targets speed. Default is TAS |
| Change Heading | ->H090 | Set targets heading |
| Change Beacon | ->B4537 | Set targets beacon |
| Drop Target | ->DROP | Drops target |
| Alt Restriction | altRestr:D:AT:dddd.d | Can also change D:AT to D:AOA or D:AOB for at At or above and At or below respectively |
| Speed Restriction | spdRestr:D:AT:ddd.d | Can also change D:AT to D:AOA or D:AOB for at At or above and At or below respectively |
| Set Handoff Margin | ->set:hoMargin=20 | Set targets handoff in miles. 'set' is case sensitive. |
| Set Handoff Duration | ->set:hoDuration=90 | Set targets handoff duration in seconds. 'set' is case sensitive. |
| Set target to coast | ->set:zab:state=coast | Set targets coast indicator. 'set' is case sensitive. |
| Clear targets coast indicator | ->clear:zab:state | Clear the targets coast indicator. 'clear' is case sensitive. |
| Drop target from center | ->set:zab:state=drop | Drop target from listed center. 'set' is case sensitive. |
| Drop target from tracon | ->set:p50:state=drop | Drop target from listed tracon. 'set' is case sensitive. |
| Confirm SMIF | ->set:confirmSMIF | A popup window will appear to confirm commands from SMIF 'set' is case sensitive. |
The Messages tab of the Target Editor behaves as in standard mode except that only a very limited set of flight data messages are automatically generated. The initial flight plans and departure messages, where needed, are created when auto-derive is selected. When the scenario is executed with the DYSIM tbfmDriver, the NAS FP messages are converted into CMS FH and HX messages and AIG flight data messages for direct injection. The NAS DM messages are converted into CMS AH and DH messages. Also, any manually scripted NAS AM messages (with the exception of field 02 amendments) are automatically converted to CMS AH messages at runtime. Updates to AIG flight data must be manually scripted.
Within the Messages tab, the Generic Message Editor and the CMS Message Editor have a new “Outgoing” check box. This allows any CMS message of AIG flight data message to be manually scripted for direct injection. Selecting the “Outgoing” check box reverses the Source and Destination devices.
Adaptation Tab
The adaptation tab will allow you to view adapted ERAM interfaces and Display System (DS) devices

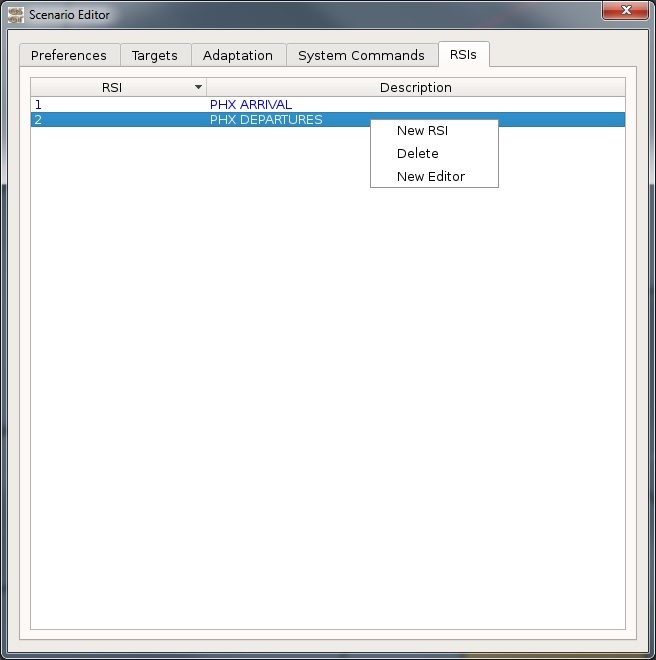
Record Selector Indicator (RSI) Tab
This tab will allow you to see a list of RSIs including the RSI number and label. It will allow you to create/edit/delete an RSI with a 'right click'.
Clicking 'New Editor' will open a new 'Scenario Editor' window allowing you to add/modify targets with that RSI as well as System Commands specific to that RSI.

Preview
To preview a scenario, select 'Preview' from the menu bar. The standard menu bar is replaced with the Preview mode menu bar. Buttons are displayed to control scenario playback.

Airplane symbols are displayed on the map to indicate the track position of all scenario targets. Flight data messages can be displayed during the playback.
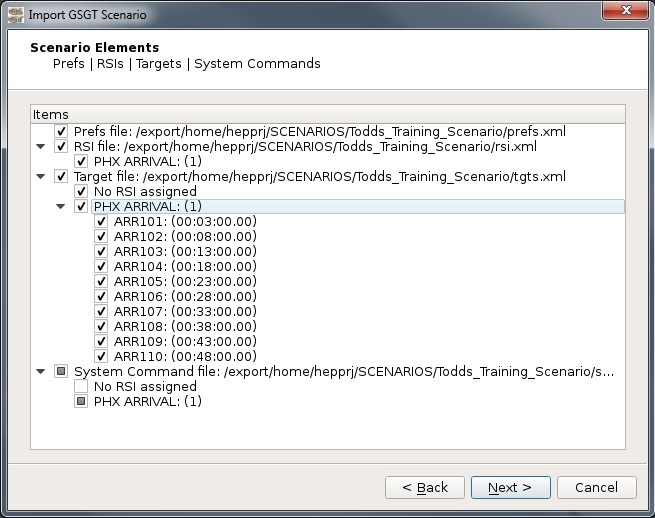
Import
Import scenario elements from an existing scenario in $GSGT_WORK_PATH. You may select to import RSIs, System Commands, Targets, or any variation of the three. You can import all elements or a subset (select by RSI).
When selecting elements, a 'check mark' will mean everything in the subdirectory is checked to be imported and a 'gray box' will mean at least one element is checked to be imported.


After importing a log file will save inside the scenario directory to keep track of the changes.
Reports
Reports include the GSGT Log and the Message Injection Report
Weather
Initializing TBFM Weather Mode
To start the default version of GSGT in TBFM Weather mode, at the command line enter:
gsgt --wx --tbfm
To launch a version of GSGT that is not the default, specify the full path:
/usr/local/gsgt.x.x.x.x/bin/gsgt --wx --tbfm
When GSGT in weather mode is started, it is necessary to open an existing weather scenario or to create a new weather scenario.
| Selection | Response |
| Open | Choose an existing scenario from $WX_PATH |
| New | 1. Choose a location in $WX_PATH, and enter a name for the new weather scenario. 2. Add desired time slices. |
Creating a new weather scenario
After launching GSGT from the command line the GSGT window will pop up. In the window 'left click' on 'Scenario' and select 'New'. Alternatively you can select the blank piece of paper icon below 'Scenario'.
Picture of new weather Scenario
'New Scenario' will appear. GSGT will need at least one ERAM airspace adaptation selected in order to create a scenario. 'Left click' on 'adaptation' and then the subfolder 'eadp' to get a list of available ERAM adaptations. Select at least one airspace to load.
Whether a new weather scenario was created or an existing weather scenario was selected, GSGT opens an individual map display window for each time slice. Optionally, select "Load Adaptation" from the "Scenario" menu bar. Displaying ARTCC airspace and sectors may be useful.
- Weather scenarios encompass the entire CONUS. At Scenario Start, SMIF generates site specific files.
RUC Editor
To launch the RUC Editor, click on the third icon on menu bar on the left side of the "time slice"
- Use the cursor to select grid cells on the map display
- Select altitude layer(s)
- Apply weather values:
- Temperature
- Pressure
- Wind Speed
- Wind Direction
- Apply weather values:
#!
= Test Pictures =


= First Section =

== Sub Section 1 ==

== Sub Section 2 ==

=== Sub Sub Section 1 ===

==== Sub Sub Sub Section 1 ====

==== Sub Sub Sub Section 2 ====

=== Sub Sub Section 2 ===

== Sub Section 3

= Second Section =
Attachments (11)
-
Airspace.jpg (205.0 KB) - added by 7 years ago.
Airspace.jpg
-
Airspace.2.jpg (205.0 KB) - added by 7 years ago.
Airspace.jpg
- Import.jpg (95.6 KB) - added by 7 years ago.
- Import_Save.jpg (48.3 KB) - added by 7 years ago.
- SE_Adaptation.jpg (58.9 KB) - added by 7 years ago.
- SE_Preferences.jpg (119.3 KB) - added by 7 years ago.
- SE_RSI.jpg (49.9 KB) - added by 7 years ago.
- Preview.jpg (109.6 KB) - added by 7 years ago.
- TE_Main.jpg (115.8 KB) - added by 7 years ago.
- TE_Dynamics.jpg (94.2 KB) - added by 7 years ago.
- TE_Messages.jpg (97.6 KB) - added by 7 years ago.
Download all attachments as: .zip